
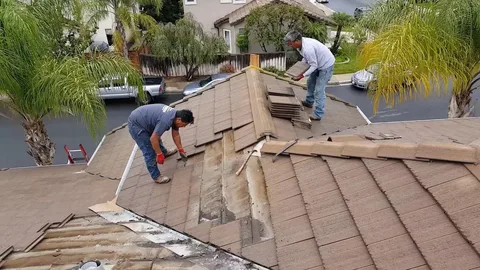
A roof leak rarely announces itself with a dramatic drip from the ceiling. More often, it starts quietly: a little water slipping past worn flashing, soaking into insulation, and spreading along rafters or joists long before anything shows up indoors. By the time you see a brown stain or bubbling paint, the damage has usually been building for weeks or even months.
The good news is that most leaks leave clues long before they reach your living space. With the right approach to roof replacement , you can trace a problem to its source, fix it while it’s still small, and avoid costly repairs to drywall, insulation, wiring and framing. This guide walks you through the warning signs, a step-by-step way to find a leak yourself, the methods professionals use, and when it’s time to call in help.
Why Early Roof Leak Detection Matters
Water is patient. Even a slow leak can cause serious problems when it’s left alone:
- Mold and mildew can begin growing on damp materials within 24 to 48 hours, affecting indoor air quality.
- Wet insulation loses much of its effectiveness, raising heating and cooling costs.
- Wood rot weakens roof decking, rafters and ceiling joists over time.
- Electrical hazards develop when water reaches light fixtures, wiring or junction boxes.
- Repair costs climb quickly once water moves from the roof into interior finishes.
Catching a leak early often means the difference between a simple flashing repair and a project that involves ceilings, walls and structural work.
Early Warning Signs of a Roof Leak
You don’t need to wait for a drip. Watch for these signs inside and outside your home.
Inside the Home
- Water stains or discolored rings on ceilings, especially near exterior walls or chimneys
- Peeling paint, bubbling or sagging drywall
- A musty smell in upper-floor rooms, closets or the attic
- Damp or compressed insulation in the attic
- Dark spots, mold or water trails on the underside of roof decking or rafters
- Rusted nail tips poking through the attic ceiling
- Higher-than-usual energy bills with no other clear cause
Outside the Home
- Missing, cracked, curled or lifted shingles
- Loose, rusted or separated flashing around chimneys, vents and skylights
- Granules collecting in gutters or at downspouts
- Clogged or overflowing gutters
- On flat roofs: ponding water, blisters, cracks or open seams
- Moss, algae or debris buildup, which traps moisture against the roof
Why Roof Leaks Are So Hard to Find
One of the most frustrating things about roof leaks is that the stain on your ceiling is often nowhere near the actual opening. Water enters at one point, then runs downhill along the roof deck, rafters, pipes or the top of the insulation before it finally drips. A stain in the middle of a bedroom ceiling may come from a damaged vent boot several feet uphill.
That’s why effective leak hunting starts with the most common entry points and works systematically, rather than simply patching the spot directly above the stain.
Most Common Sources of Roof Leaks
| Leak source | What usually goes wrong |
| Chimney flashing | Cracked sealant, loose or rusted step flashing, failed counter-flashing |
| Plumbing vent boots | Rubber gaskets crack and split from sun exposure |
| Skylights | Worn seals or improperly installed flashing |
| Roof valleys | Heavy water flow wears shingles or exposes seams |
| Damaged shingles | Wind, age or impact opens gaps in the roof surface |
| Flat roof seams | Seams lift, separate or crack over time |
| Gutters and roof edges | Clogs push water back under shingles; ice dams in winter |
| Rooftop equipment | Penetrations for HVAC units, antennas or solar mounts lose their seal |
DIY Roof Leak Detection: Step-by-Step
If you’re comfortable working safely, these steps can help you pinpoint a leak. Always put safety first: avoid walking on wet, steep or icy roofs, and use proper ladder practices.
Step 1: Start in the Attic
On a dry day, take a bright flashlight into the attic. Look for water stains, dark spots, mold or damp insulation on the underside of the roof deck. Focus on areas around chimneys, vents, skylights and valleys. Trace any water trails uphill to find where moisture first appears.
Step 2: Check During or After Rain
If it’s safe to do so, return to the attic during or soon after a rainstorm. Active drips and fresh wet spots are much easier to see when water is moving. Mark the location with chalk or tape so you can find it later.
Step 3: Look for Light
On a sunny day, turn off the attic lights and look for pinpoints of daylight coming through the roof deck. Any spot where light gets in is a spot where water can too.
Step 4: Inspect the Roof Exterior
From a ladder, or with binoculars from the ground, examine the area above where you found signs inside. Check shingles, flashing, vent boots and seams. On a flat roof, look closely at seams, drains and the edges of any rooftop equipment.
Step 5: Run a Controlled Water Test
If the source still isn’t clear, try a hose test with a helper. One person stays in the attic while the other soaks a small section of roof with a garden hose, starting low and slowly moving uphill. Spend several minutes on each area before moving on. When the person inside sees water, you’ve found the general location. Never use a pressure washer, since it can force water under shingles and create new damage.
Step 6: Document What You Find
Take photos and notes of stains, damaged areas and test results. This helps a roofer make a faster diagnosis, and it may help with an insurance claim.
Professional Roof Leak Detection Methods
Some leaks are simply too hidden for a DIY search, especially on flat roofs, older buildings, or roofs with multiple layers. Roofing professionals use specialized tools to find problems without tearing open the roof.
- Infrared thermography
Thermal cameras reveal wet areas under the roof surface, because damp insulation holds and releases heat differently from dry materials. Scans are usually done in the evening, as the roof cools.
- Electronic leak detection
Low-voltage or high-voltage testing finds breaches in the membranes of flat and low-slope roofs by tracing where electrical current passes through the waterproofing.
- Moisture meters
Handheld meters measure moisture content in roof decking, insulation and interior materials to confirm how far water has spread.
- Core sampling
A small sample cut from a flat roof shows the condition of each layer, including whether insulation is wet.
- Flood testing
On some flat roofs, a section is temporarily filled with water to check whether the membrane is watertight.
- Drone and visual inspections
Drones help inspect steep, tall or hard-to-reach roofs safely, while an experienced roofer checks every detail up close.
These methods find not only the entry point but also how far the moisture has traveled, which helps prevent a repair that fixes the hole but leaves wet materials behind.
When to Call a Professional Roofer
Contact a roofer if you notice any of the following:
- Stains that keep growing or come back after repairs
- Sagging ceilings or soft, spongy spots on the roof
- Mold growth in the attic or living spaces
- Leaks you can’t trace after a careful search
- Water near electrical fixtures
- A flat or low-slope roof with signs of ponding or blistering
- Damage after a major storm
A professional can locate the leak, assess any hidden damage and recommend a lasting fix. If you’re in New York City, our roof repair team can inspect your roof and give you clear next steps.
How to Prevent Future Roof Leaks
The best leak is the one that never starts. A few simple habits keep your roof watertight:
- Schedule a professional inspection at least once a year, ideally in spring or fall
- Inspect your roof after major storms, high winds or heavy snow
- Clean gutters and downspouts regularly
- Trim overhanging tree branches
- Replace cracked vent boots and worn sealant before they fail
- Keep flat roof drains clear and address ponding water quickly
- Check the attic a few times a year for early signs of moisture
Frequently Asked Questions
How do I find a roof leak if I can’t see where it’s coming from?
Start in the attic and trace any stains or water trails uphill, since water usually travels before it drips. If that doesn’t work, a controlled hose test or a professional inspection with thermal imaging can pinpoint the source.
How much does roof leak detection cost?
It depends on the roof size, type and the method needed. A basic visual inspection usually costs much less than advanced testing such as infrared scans or electronic testing. Many roofers apply the inspection cost toward the repair if you hire them.
Can a roof leak only when it rains heavily?
Yes. Some leaks only appear during wind-driven rain, heavy downpours or when snow melts, because water reaches openings it normally wouldn’t. That’s why a leak may seem to come and go.
Is a small roof leak an emergency?
Not always, but it shouldn’t wait. Small leaks can lead to mold, rot and electrical problems over time. If water is near wiring or the ceiling is sagging, treat it as urgent.
Will homeowners insurance cover a roof leak?
Coverage often depends on the cause. Sudden damage from a storm is more likely to be covered than leaks caused by wear or poor maintenance. Check your policy and document the damage right away.
Catch Leaks Early, Save Thousands Later
Roof Installation always give early warnings, from a faint ceiling stain to a cracked vent boot or lifted flashing. Regular attic checks, a careful exterior inspection, and quick action when something looks wrong are your best defenses against interior damage. Smart roof leak detection is really about paying attention before small problems become big ones.
If you’ve spotted signs of a leak or simply want peace of mind, Avenue NY Roofing offers professional roof leak detection and repair across New York City. Schedule your roof inspection today and stop water damage before it starts.